Difference between revisions of "Konfigurasi Email Client pada Exchange"
(Created page with "== Outlook 2013 == === IMAP === 1. Buka Outlook. 2. Pada tab File, klik Account Settings. 3. Klik New. 4. Pilih Manually configure server settings or additional server ty...") |
(→POP3) |
||
| (7 intermediate revisions by the same user not shown) | |||
| Line 3: | Line 3: | ||
1. Buka Outlook. | 1. Buka Outlook. | ||
| − | 2. Pada tab File, klik Account Settings. | + | 2. Pada tab '''File''', klik '''Account Settings'''. |
| − | 3. Klik New. | + | 3. Klik '''New'''. |
| − | 4. Pilih Manually configure server settings or additional server types, kemudian klik Next. | + | 4. Pilih '''Manually configure server settings or additional server types''', kemudian klik '''Next'''. |
| − | 5. Pada halaman Choose Service, pilih Internet E-mail, kemudian klik Next. Internet E-mail Settings window akan muncul. Lengkapi informasi | + | 5. Pada halaman '''Choose Service''', pilih '''Internet E-mail''', kemudian klik '''Next'''. '''Internet E-mail Settings''' window akan muncul. Lengkapi informasi |
berikut ini pada fields yang tersedia : | berikut ini pada fields yang tersedia : | ||
| − | o Your Name: ketik nama yang akan ditampilkan ke penerima email pada field From | + | o ''' Your Name''': ketik nama yang akan ditampilkan ke penerima email pada field From. |
| − | o E-mail Address: email@domain.tld | + | o '''E-mail Address''': email@domain.tld |
| − | o Account Type: pilih IMAP. | + | o '''Account Type''': pilih IMAP. |
| − | o Incoming mail server: eximap.luxcloud.net | + | o '''Incoming mail server''': eximap.luxcloud.net |
| − | o Outgoing mail server (SMTP): auth.luxcloud.net | + | o '''Outgoing mail server (SMTP)''': auth.luxcloud.net |
| − | o User Name: email@domain.tld | + | o '''User Name''': email@domain.tld |
| − | o Password: ketik password. | + | o '''Password''': ketik password. |
| − | 6. Klik More Settings. | + | 6. Klik '''More Settings'''. |
| − | 7. Pada Outgoing Server tab, pilih My outgoing server (SMTP) requires authentication checkbox. Kemudian klik Use same settings as my | + | 7. Pada '''Outgoing Server''' tab, pilih '''My outgoing server (SMTP) requires authentication''' checkbox. Kemudian klik '''Use same settings as my |
| − | incoming mail server. | + | incoming mail server.''' |
| − | 8. Pada Advanced tab. Ubah konfigurasi sebagai berikut : | + | 8. Pada '''Advanced''' tab. Ubah konfigurasi sebagai berikut : |
| − | o Untuk Incoming server (IMAP), Use the following type of encrypted connection, pilih SSL pada drop-down list. | + | o Untuk '''Incoming server (IMAP), Use the following type of encrypted connection''', pilih '''SSL''' pada drop-down list. |
| − | o Untuk Outgoing server (SMTP), Use the following type of encrypted connection, pilih TLS pada drop-down list. | + | o Untuk '''Outgoing server (SMTP), Use the following type of encrypted connection''', pilih '''TLS''' pada drop-down list. |
| − | 9. Klik OK untuk menyimpan perubahan di atas. | + | 9. Klik '''OK''' untuk menyimpan perubahan di atas. |
| − | 10. Pada halaman Add New Account, klik Next. Setelah Outlook test email account, klik Close untuk menutup Test Account Settings | + | 10. Pada halaman '''Add New Account''', klik '''Next'''. Setelah Outlook test email account, klik '''Close''' untuk menutup '''Test Account Settings''' |
dialog box. | dialog box. | ||
| − | 11. Klik Next, kemudian klik Finish. | + | 11. Klik '''Next''', kemudian klik '''Finish'''. |
| Line 33: | Line 33: | ||
[[File:Desy-2.jpg]] | [[File:Desy-2.jpg]] | ||
| + | === POP3 === | ||
| + | 1. Buka Outlook | ||
| + | 2. Pada tab '''File''', Klik '''Account Settings'''. | ||
| + | 3. Click '''New'''. | ||
| + | 4. Pilih '''Manually configure server settings or additional server types''', kemudian klik '''Next'''. | ||
| + | 5. Pada halaman '''Choose Service''', pilih '''Internet E-mail''', kemudian klik '''Next'''. '''Internet E-mail Settings''' window akan muncul. Lengkapi informasi | ||
| + | berikut ini pada fields yang tersedia : | ||
| + | o '''Your Name''': ketik nama yang akan ditampilkan ke penerima email pada field From: . | ||
| + | o '''E-mail Address''': email@domain.tld | ||
| + | o '''Account Type''': pilih POP3. | ||
| + | o '''Incoming mail server''': expop.luxcloud.net | ||
| + | o '''Outgoing mail server (SMTP)''': auth.luxcloud.net | ||
| + | o '''User Name''': email@domain.tld | ||
| + | o '''Password''': ketik password. | ||
| + | 6. Klik '''More Settings'''. | ||
| + | 7. Pada '''Outgoing Server''' tab, pilih '''My outgoing server (SMTP) requires authentication''' checkbox. Kemudian klik '''Use same settings as my | ||
| + | incoming mail server'''. | ||
| + | 8. Pada '''Advanced''' tab. Ubah konfigurasi sebagai berikut : | ||
| + | o Untuk '''Incoming server (POP3), Use the following type of encrypted connection''', pilih '''SSL''' pada drop-down list. | ||
| + | o Untuk '''Outgoing server (SMTP), Use the following type of encrypted connection''', pilih '''TLS''' pada drop-down list. | ||
| + | 9. Klik '''OK''' untuk menyimpan perubahan tersebut. | ||
| + | 10. Pada halaman '''Add New Account''', klik '''Next'''. Setelah Outlook test email account, klik '''Close''' untuk menutup '''Test Account Settings''' dialog box. | ||
| + | 11. Klik '''Next''', kemudian klik '''Finish'''. | ||
| + | |||
| + | |||
| + | '''Contoh POP3 :''' | ||
| + | |||
| + | |||
| + | [[File:Desy-3.jpg]] | ||
| + | [[File:Desy-4.jpg]] | ||
| − | == | + | == Mozilla Thunderbird == |
| + | === IMAP === | ||
| − | 1. | + | 1. Launch Mozilla Thunderbird. |
| − | 2. Pada | + | 2. Pada menu '''Accounts''', klik '''Create a new account: Email'''. |
| − | 3. | + | 3. Pada welcome screen klik '''Skip this and use my existing email'''. |
| − | 4 | + | 4. Lengkapi informasi di bawah ini : |
| − | + | o '''Your Name''', ketik nama yang akan ditampilkan ke penerima email. | |
| − | + | o '''Email Address''', ketik email@domain.tld. | |
| − | o Your Name | + | o '''Password''', ketik password email account. |
| − | o | + | 5. Klik '''Continue'''. Ubah konfigurasi pada incoming dan outgoing servers: |
| − | o | + | o Pilih '''IMAP'''. |
| − | o | + | o Ketik ''eximap.luxcloud.net'' di '''Server hostname''' pada incoming server. |
| − | o | + | o '''Port''' incoming server, pilih '''993'''. |
| − | o | + | o '''SSL''' incoming server, pilih '''SSL/TLS'''. |
| − | o | + | o '''Authentication''' incoming server, pilih '''Normal password'''. |
| − | 6. | + | o '''Username''' incoming server, ketik ''email@domain.tld''. |
| − | + | o Ketik ''auth.luxcloud.net'' di '''Server hostname''' pada outgoing server. | |
| − | + | o '''Port''' outgoing server, pilih '''25'''. | |
| − | + | o '''SSL''' outgoing server, pilih '''STARTTLS'''. | |
| − | o | + | o '''Authentication''' outgoing server, pilih '''Normal password'''. |
| − | o | + | o '''Username''' outgoing server, ketik ''email@domain.tld''. |
| − | + | 6. Click '''Done'''. | |
| − | + | ||
| − | + | === POP3 === | |
| + | |||
| + | 1. Launch Mozilla Thunderbird. | ||
| + | 2. Pada menu '''Accounts''', klik '''Create a new account: Email'''. | ||
| + | 3. Pada welcome screen klik '''Skip this and use my existing email'''. | ||
| + | 4. Lengkapi informasi di bawah ini : | ||
| + | o '''Your Name''', ketik nama yang akan ditampilkan ke penerima email. | ||
| + | o '''Email Address''', ketik ''email@domain.tld''. | ||
| + | o '''Password''', ketik password email account. | ||
| + | 5. Klik '''Continue'''. Ubah konfigurasi pada incoming dan outgoing servers: | ||
| + | o Pilih '''POP3'''. | ||
| + | o Ketik ''expop.luxcloud.net'' di '''Server hostname''' pada incoming server. | ||
| + | o '''Port''' incoming server, pilih '''995'''. | ||
| + | o '''SSL''' incoming server, pilih '''SSL/TLS'''. | ||
| + | o '''Authentication''' incoming server, pilih '''Normal password'''. | ||
| + | o '''Username''' incoming server, ketik ''email@domain.tld''. | ||
| + | o Ketik ''auth.luxcloud.net'' di '''Server hostname''' pada outgoing server. | ||
| + | o '''Port''' outgoing server, pilih '''25'''. | ||
| + | o '''SSL''' outgoing server, pilih '''STARTTLS'''. | ||
| + | o '''Authentication''' outgoing server, pilih '''Normal password'''. | ||
| + | o '''Username''' outgoing server, ketik ''email@domain.tld''. | ||
| + | 6. Klik '''Done'''. | ||
Latest revision as of 11:40, 15 March 2017
Outlook 2013
IMAP
1. Buka Outlook.
2. Pada tab File, klik Account Settings.
3. Klik New.
4. Pilih Manually configure server settings or additional server types, kemudian klik Next.
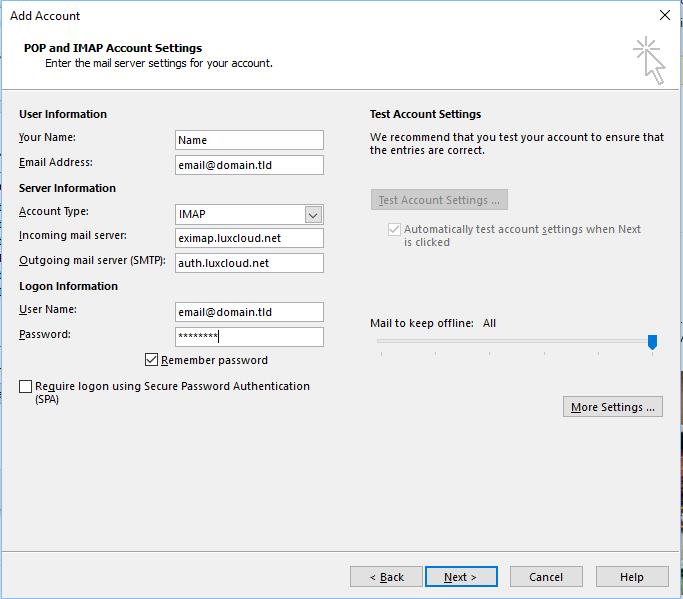
5. Pada halaman Choose Service, pilih Internet E-mail, kemudian klik Next. Internet E-mail Settings window akan muncul. Lengkapi informasi
   berikut ini pada fields yang tersedia :
     o  Your Name: ketik nama yang akan ditampilkan ke penerima email pada field From.
     o	E-mail Address: email@domain.tld
     o	Account Type: pilih IMAP.
     o	Incoming mail server: eximap.luxcloud.net
     o	Outgoing mail server (SMTP): auth.luxcloud.net
     o	User Name: email@domain.tld
     o	Password: ketik password.
6. Klik More Settings.
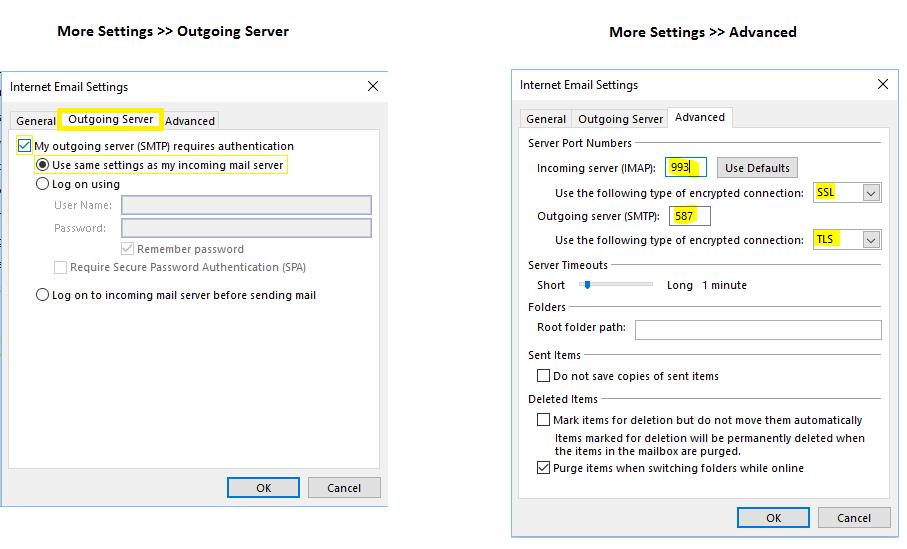
7. Pada Outgoing Server tab, pilih My outgoing server (SMTP) requires authentication checkbox. Kemudian klik Use same settings as my
   incoming mail server.
8. Pada Advanced tab. Ubah konfigurasi sebagai berikut :
     o	Untuk Incoming server (IMAP), Use the following type of encrypted connection, pilih SSL pada drop-down list.
     o	Untuk Outgoing server (SMTP), Use the following type of encrypted connection, pilih TLS pada drop-down list.
9. Klik OK untuk menyimpan perubahan di atas.
10. Pada halaman Add New Account, klik Next. Setelah Outlook test email account, klik Close untuk menutup Test Account Settings
    dialog box.
11. Klik Next, kemudian klik Finish.
Contoh IMAP :
POP3
1. Buka Outlook
2. Pada tab File, Klik Account Settings.
3. Click New.
4. Pilih Manually configure server settings or additional server types, kemudian klik Next.
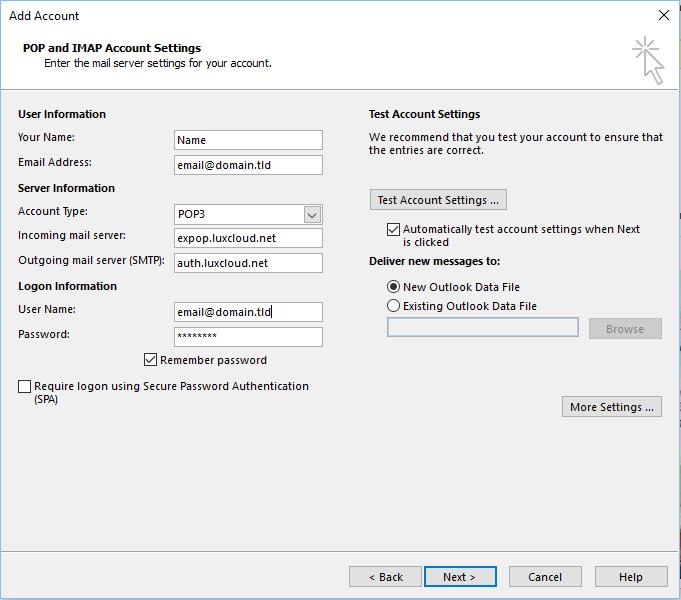
5. Pada halaman Choose Service, pilih Internet E-mail, kemudian klik Next. Internet E-mail Settings window akan muncul. Lengkapi informasi
   berikut ini pada fields yang tersedia :
     o	Your Name: ketik nama yang akan ditampilkan ke penerima email pada field From: .
     o	E-mail Address: email@domain.tld
     o	Account Type: pilih POP3.
     o	Incoming mail server: expop.luxcloud.net
     o	Outgoing mail server (SMTP): auth.luxcloud.net
     o	User Name: email@domain.tld
     o	Password: ketik password.
6. Klik More Settings.
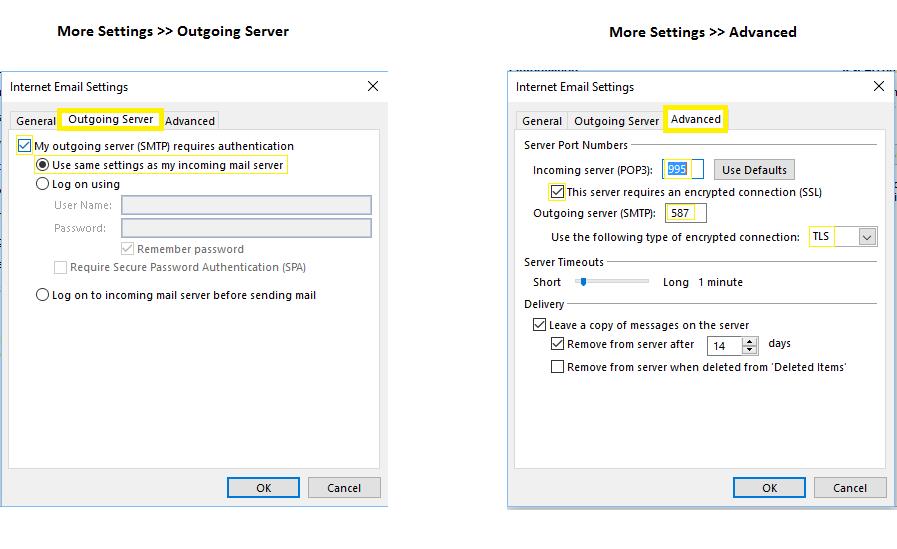
7. Pada Outgoing Server tab, pilih My outgoing server (SMTP) requires authentication checkbox. Kemudian klik Use same settings as my
   incoming mail server.
8. Pada Advanced tab. Ubah konfigurasi sebagai berikut :
     o	Untuk Incoming server (POP3), Use the following type of encrypted connection, pilih SSL pada drop-down list.
     o	Untuk Outgoing server (SMTP), Use the following type of encrypted connection, pilih TLS pada drop-down list.
9. Klik OK untuk menyimpan perubahan tersebut.
10. Pada halaman Add New Account, klik Next. Setelah Outlook test email account, klik Close untuk menutup Test Account Settings dialog box.
11. Klik Next, kemudian klik Finish.
Contoh POP3 :
Mozilla Thunderbird
IMAP
1. Launch Mozilla Thunderbird.
2. Pada menu Accounts, klik Create a new account: Email.
3. Pada welcome screen klik Skip this and use my existing email.
4. Lengkapi informasi di bawah ini :
     o Your Name, ketik nama yang akan ditampilkan ke penerima email.
     o	Email Address, ketik email@domain.tld.
     o	Password, ketik password email account.
5. Klik Continue. Ubah konfigurasi pada incoming dan outgoing servers:
     o	Pilih IMAP.
     o	Ketik eximap.luxcloud.net di Server hostname pada incoming server.
     o	Port incoming server, pilih 993.
     o	SSL incoming server, pilih SSL/TLS.
     o	Authentication incoming server, pilih Normal password.
     o	Username incoming server, ketik email@domain.tld.
     o	Ketik auth.luxcloud.net di Server hostname pada outgoing server.
     o	Port outgoing server, pilih 25.
     o	SSL outgoing server, pilih STARTTLS.
     o	Authentication outgoing server, pilih Normal password.
     o	Username outgoing server, ketik email@domain.tld.
6. Click Done.
POP3
1. Launch Mozilla Thunderbird.
2. Pada menu Accounts, klik Create a new account: Email.
3. Pada welcome screen klik Skip this and use my existing email.
4. Lengkapi informasi di bawah ini :
     o	Your Name, ketik nama yang akan ditampilkan ke penerima email.
     o	Email Address, ketik email@domain.tld.
     o	Password, ketik password email account.
5. Klik Continue. Ubah konfigurasi pada incoming dan outgoing servers:
     o	Pilih POP3.
     o	Ketik expop.luxcloud.net di Server hostname pada incoming server.
     o	Port incoming server, pilih 995.
     o	SSL incoming server, pilih SSL/TLS.
     o	Authentication incoming server, pilih Normal password.
     o	Username incoming server, ketik email@domain.tld.
     o	Ketik auth.luxcloud.net di Server hostname pada outgoing server.
     o	Port outgoing server, pilih 25.
     o	SSL outgoing server, pilih STARTTLS.
     o	Authentication outgoing server, pilih Normal password.
     o	Username outgoing server, ketik email@domain.tld.
6. Klik Done.


