Category:Email Exchange
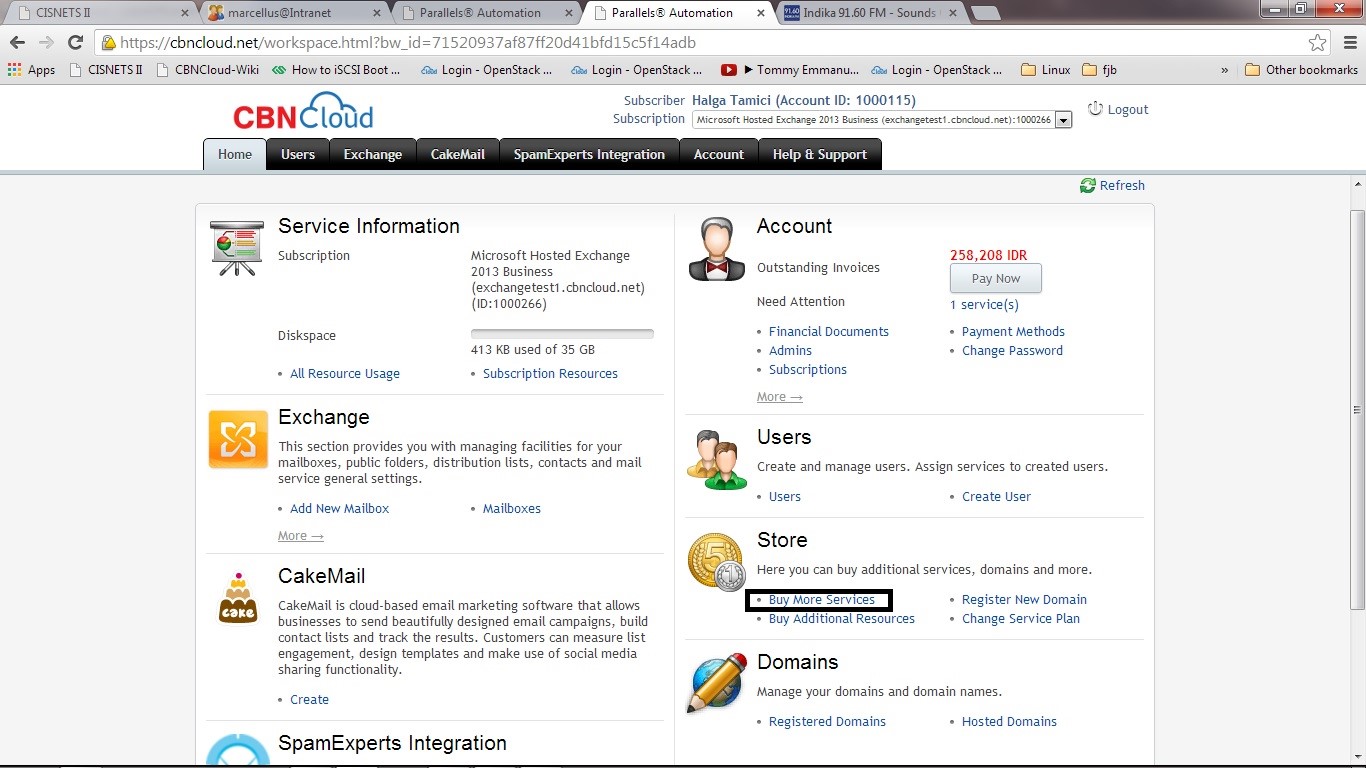
1. Lalu akan tampil dashboard untuk user berikut, dan pada “store > buy more services”
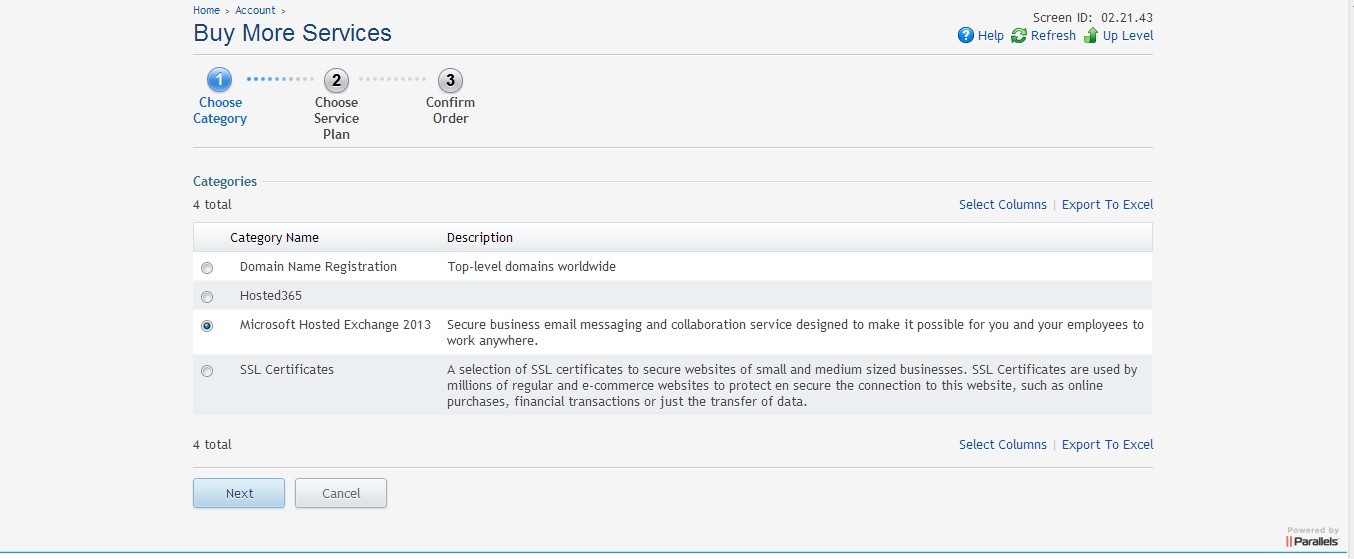
2. Selanjutnya akan tampil menu pilihan service yang akan kita pilih, pilih “Microsoft Hosted Exchange 2013 “ dan klik “Next”
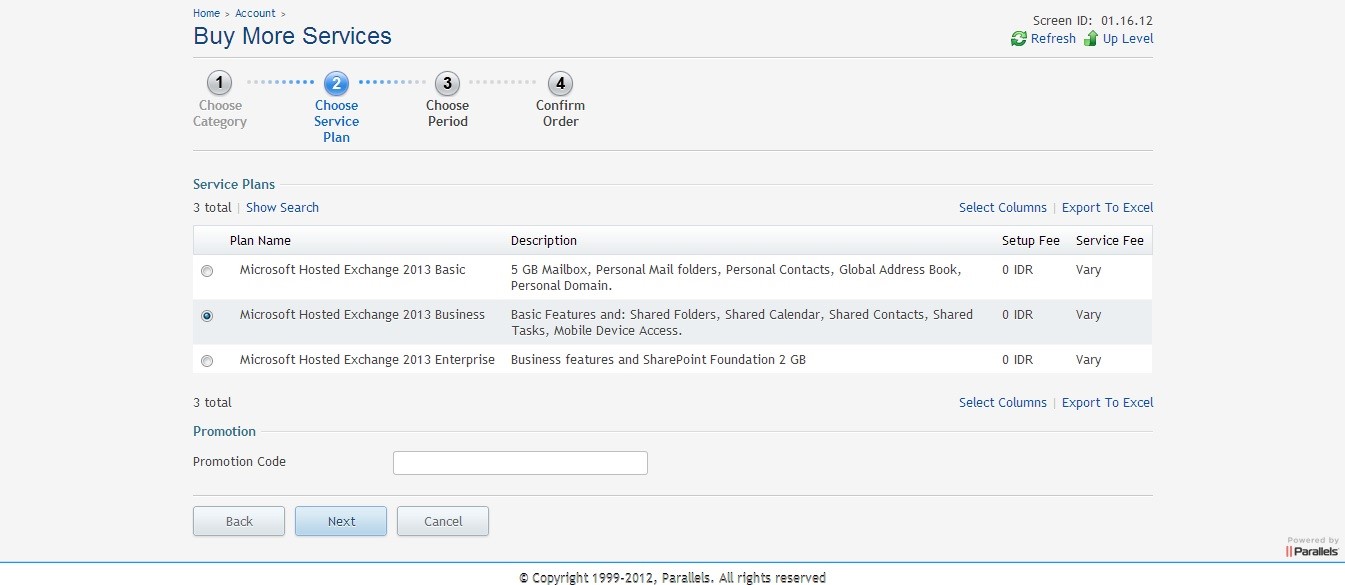
3. Setelah itu kita memilih paket exchange yang akan kita gunakan dimana kita akan menggunakan “Microsoft Hosted Exchange 2013 Business” lalu klik tombol “Next”
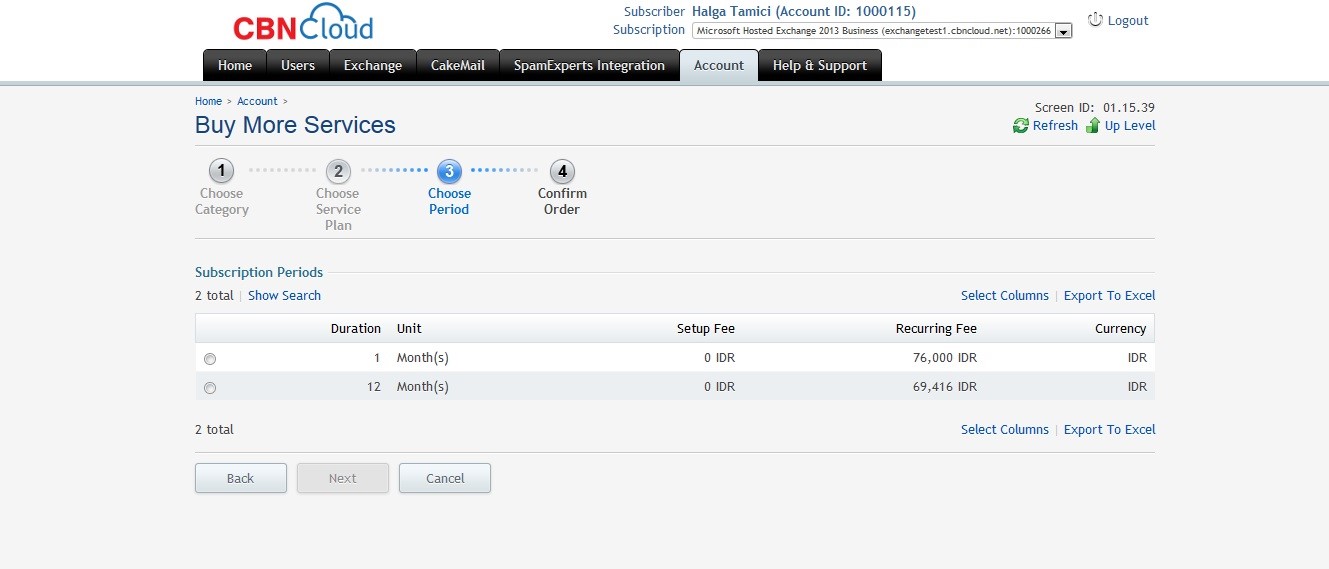
4. Lalu akan masuk ke pilihan menu durasi pemakaian, pilih sesuai kebutuhan lalu klik “Next”
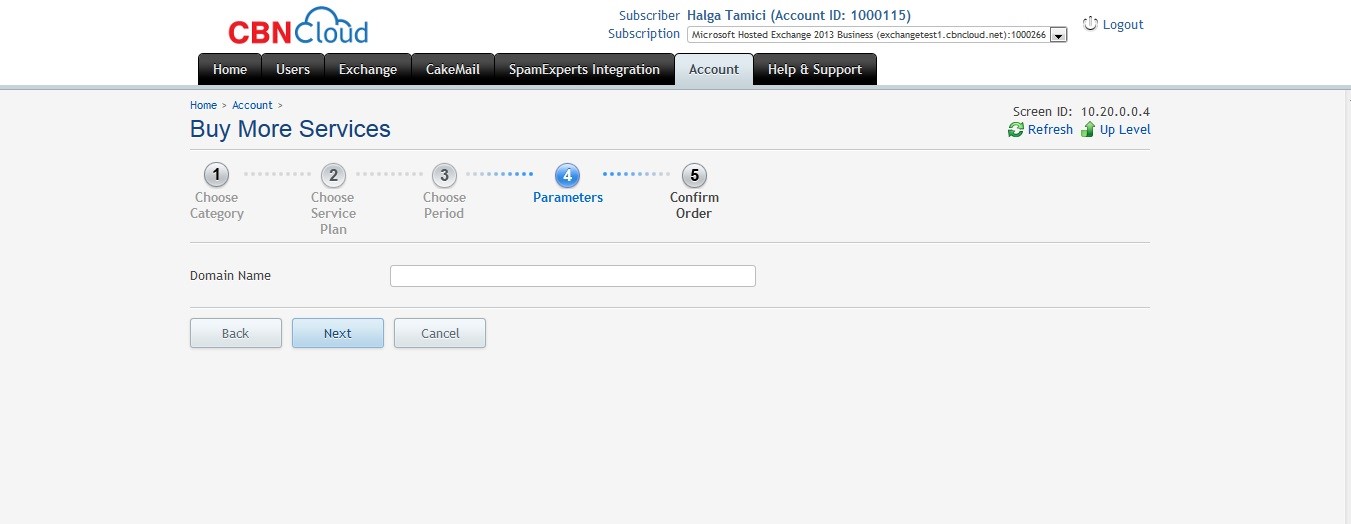
5. Masukkan nama domain sesuai dengan data customer lalu klik “Next”
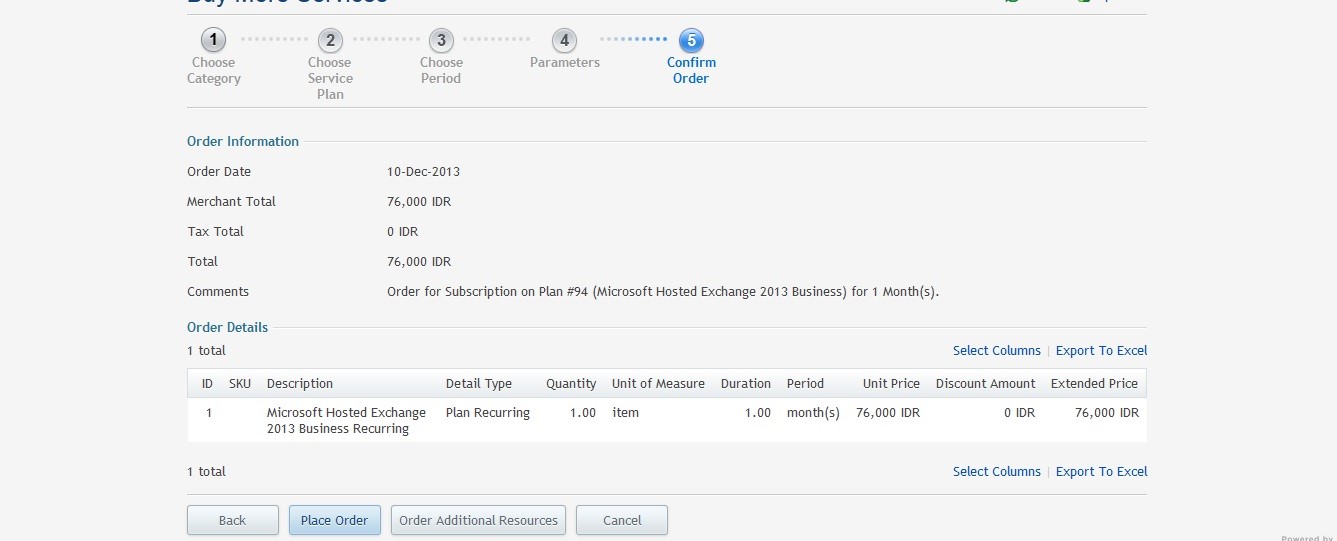
6. Tampilan berikut adalah detail yang sudah customer buat untuk service yang mereka pakai, klik “place order” untuk mengaktifkan service yang mereka sudah buat
Contents
- 1 Email Exchange Sponsored by LuxCloud
- 2 Setting Email Client Thunderbird
- 3 Setting Email Client Windows Phone
- 4 Setting Email Client Android
- 5 Setting Email Client Iphone
- 6 Configuring Mozilla Thunderbird to Connect Mailbox via IMAP
- 7 How to configure Microsoft Outlook Express to connect mailbox via IMAP
- 8 Configuring Apple Mail 2 to Connect Mailbox via IMAP
- 9 Configuring Microsoft Office Outlook 2007 to Connect Mailbox via IMAP
- 10 Configuring Microsoft Office Outlook 2010 to Connect Mailbox via IMAP
- 11 Configuring Entourage 2004 to Connect Mailbox via IMAP
- 12 Configuring Entourage 2008 to Connect Mailbox via IMAP
- 13 Configuring Outlook 2011 for Mac to Connect Mailbox via IMAP
Email Exchange Sponsored by LuxCloud
Jika akun exchange sudah terdaftar di luxcloud, kita bisa mengecek DNS untuk domain email tersebut apakah sudah update recordnya dengan record luxcloud, jika belum bisa ditambahkan 3 record ini di DNS customer : TXT domaincustomer v=spf1 redirect=cbncloud.net 3600
CNAME autodiscover.domaincustomer autodiscover-redirect.g4cloud.asia. 3600
MX domaincustomer 10 maildrop.g4cloud.asia. 3600
Setting Email Client Thunderbird
Untuk thunderbird kita perlu menginstall add-on / plugin exchange yg bernama exquilla berikut langkah – langkahnya :
1. download add-on ExQuilla
2. Open Thunderbird.
3. Go to Tools | Addons.
4. In the search field, type Exchange.
5. Click the ExQuilla addon.
6. Click Install.
7. Click Restart within Thunderbird.
Setelah thunderbird restart lakukan langkah selanjutnya :
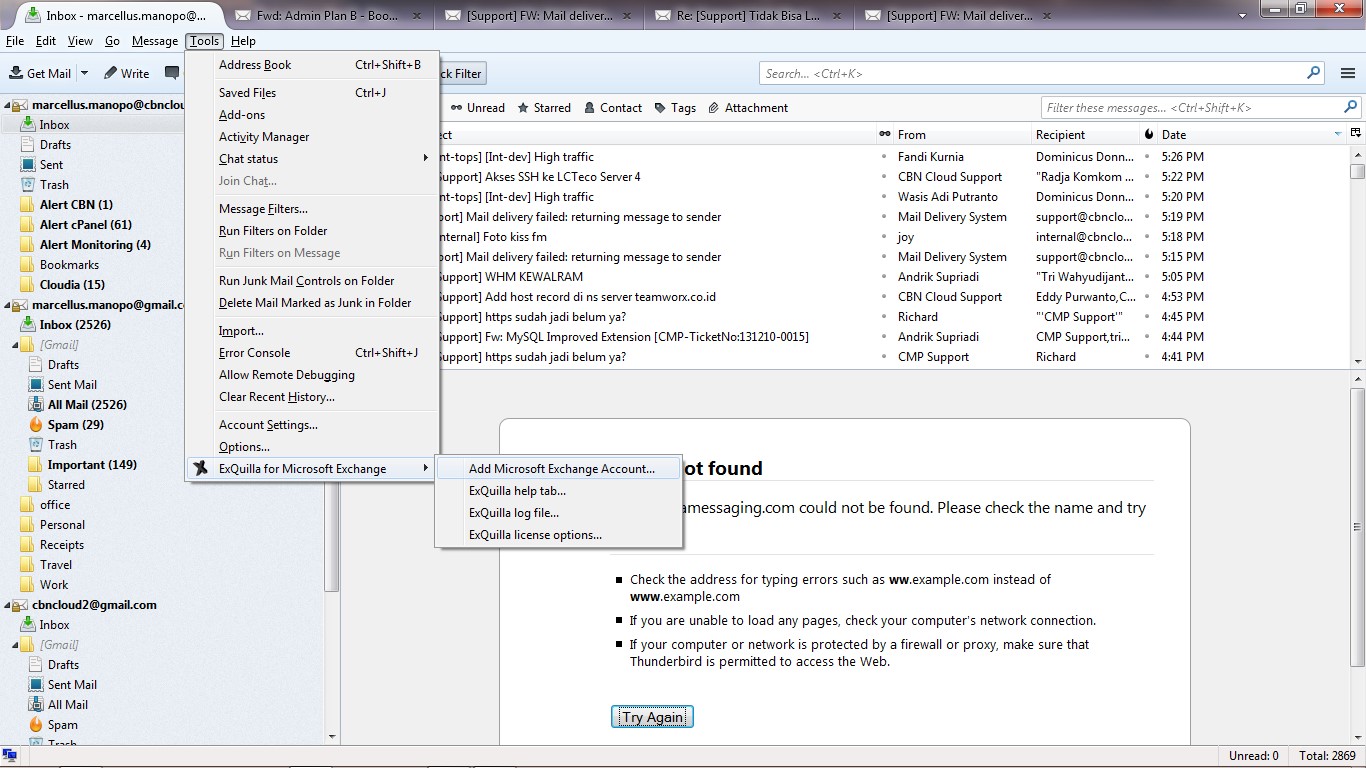
1. Go to Tools | ExQuilla for Microsoft Exchange and then select Add Microsoft Exchange Account.
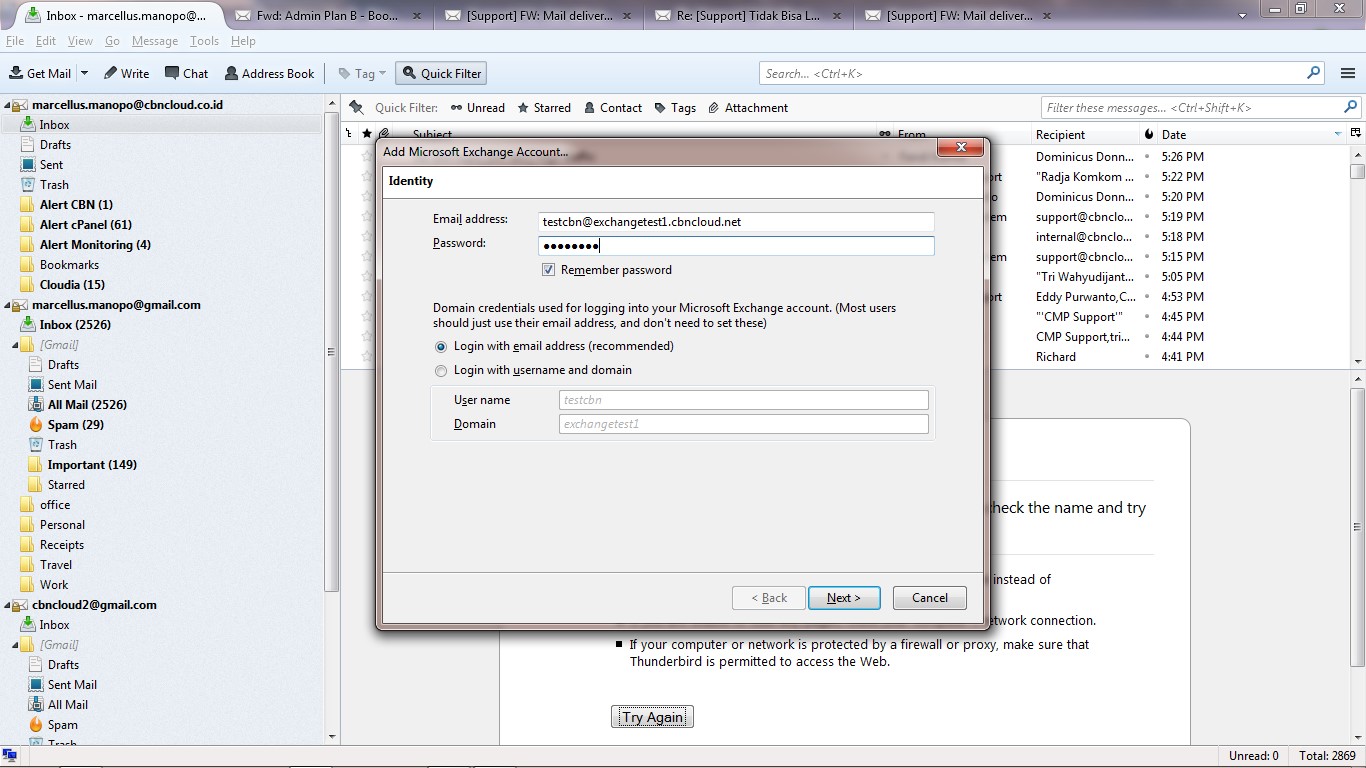
2. Isikan data email exchange, pilih “Login with email addresses (recomendded)”, klik “Next”
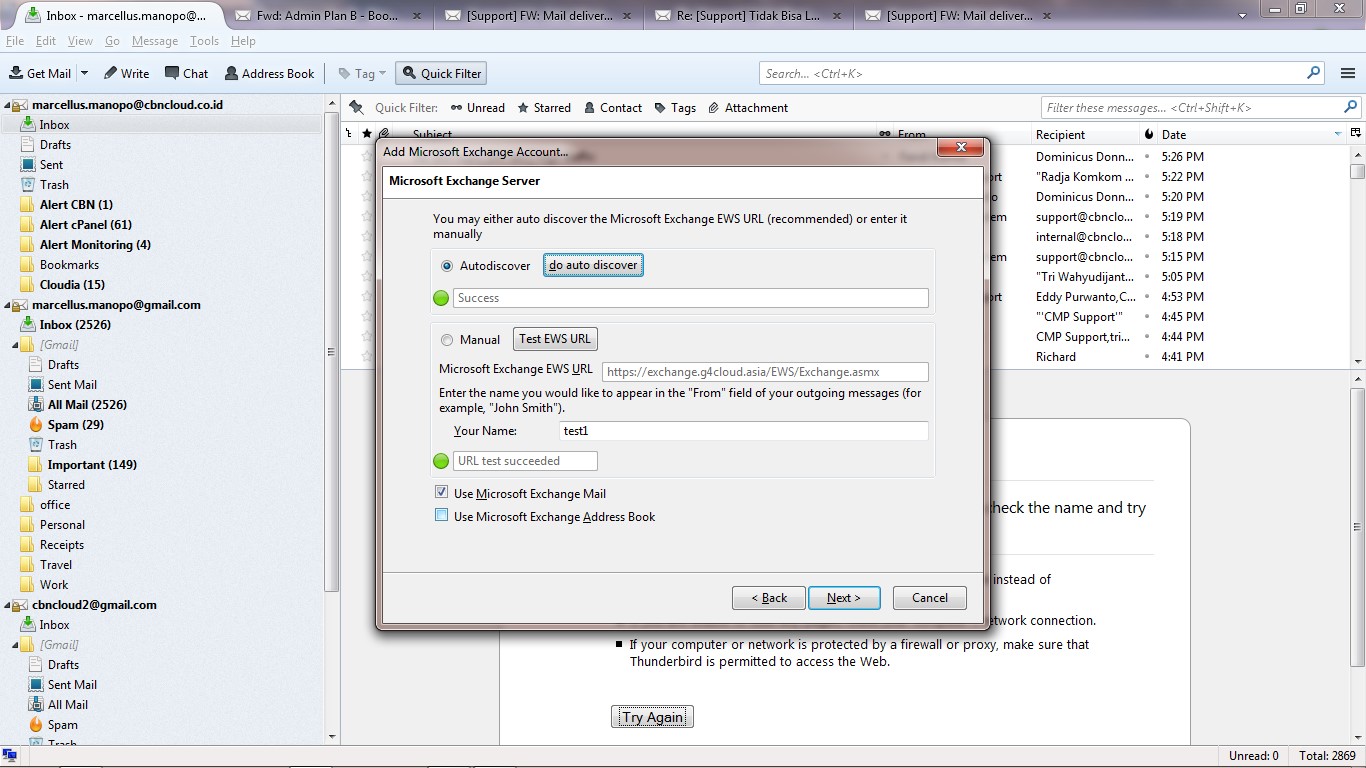
3. Pilih “auto discover” dan klik “do auto discover”, jika sukses akan tampil seperti berikut lalu klik “Next” dan “Finish”
Setting Email Client Windows Phone
1. Masuk Setting --> email + accounts --> + add an account (set up email, contacts, Facebook and others) > Outlook (outlook.com, exchange, office365)
2. masukkan email address dan password email lalu “sign in”
3. Jika masih memerlukan memasukkan domain, masukkan nama domain berikut dan klik “sign in”:
domain name : LCASAD
4. Jika masih gagal pilih “advanced” dan masukkan nama server lalu klik “sign in” :
server name : exchange.g4cloud.asia
Setting Email Client Android
Masuk ke email --> setting --> tambahkan email --> masukkan email user dan password --> pilih “ microsoft exchange activesync” --> OK
--> Next --> Activate --> Done
Setting Email Client Iphone
Masuk ke setting --> mail, contacts, calendars --> add account --> exchange --> masukkan email dan password --> next --> save
Configuring Mozilla Thunderbird to Connect Mailbox via IMAP
1.Launch Mozilla Thunderbird
2.Click Create a new account. The Account Wizard starts.
3.Click Email account and press Next >. Fill out the form that appears:
•In the Your Name field, type in your name that will be shown to your e-mail recipients.
•In the Email Address field, type in email address.
4.Click Next > to continue the Wizard. Provide the following information about your incoming server:
•Select the IMAP type.
•Type in imap.g4cloud.asia in the Incoming Server field.
5.Click Next > to proceed to the next step of the Wizard. The User Names Wizard step is displayed. Type in email address in the Incoming User Name field.
6.Click Next > to continue. The Account Name Wizard step is displayed. Type in the reference name for your account, for example "Work Account" in the Account Name field.
7.Click Next > to proceed to the final Wizard step. The summary information is displayed. Check if everything is correct.
8.Click Finish to complete the Wizard. Your IMAP email account is now created.
9.On the Thunderbird menu, select Tools > Account Settings. The Account Settings dialog window is displayed.
10.In the folder list, select the just created account and click Server Settings. The incoming server settings for your account are displayed at the right part of the Account Settings window.
11.Under Security Settings select SSL.
12.In the folder list of the Account Setting window, click Outgoing Server (SMTP). The Outgoing Server (SMTP) Settings are displayed at the right part of the window. Here you can see all SMTP servers set up on your computer (if there any).
13.Click Add. The SMTP Server dialog box is displayed. Fill out the form as follows:
•In the Description field (optional), type in a free-form description of your outgoing mail server.
•In the Server Name field, type auth.g4cloud.asia.
•Select the Use name and password checkbox and enter email address in the User Name field.
•Under Use secure connection select TLS.
14.Click OK to save changes and exit the SMTP Server dialog box.
15.Select your account ('Work Account') in the folder list of the Account Settings window. The account settings are displayed at the right part of the window.
16.From the Outgoing Server (SMTP) drop-down list, select the just added SMTP server.
17.Click OK to save your changes and exit the Account Settings dialog window. You have just configured your IMAP email account.
18.On the Thunderbird main window, click on the down-oriented triangle to the right of the Get Mail icon. The drop-down list opens that contains your existing e-mail accounts.
19.Select the just configured account. You are prompted to enter the password
20.Type in your password and select the Use Password Manager to remember this password checkbox if necessary.
21.Click OK.
How to configure Microsoft Outlook Express to connect mailbox via IMAP
1.Start Outlook Express. Choose Tools > Accounts from the menu on the top.
2.Click Add button and choose Mail.
3.Display Name: Type your mailbox display name test1 and click Next.
4.E-mail address: Type your e-mail address email address and click Next.
5.Choose My incoming server is a IMAP server from the dropdown box. Fill in mail server information:
•Incoming mail server: imap.g4cloud.asia
•Outgoing mail server: auth.g4cloud.asia
•Click Next.
6.Fill in logon information:
•Account name: Type your login email address.
•Password: Type your mailbox password.
•Click Next, then click Finish.
7.Select mail account named imap.g4cloud.asia and click Properties button.
8.Switch to the Servers tab. In the Outgoing Mail Server check My server requires authentication.
9.Switch to the Advanced tab. In the Server Port Numbers check both This server requires a secure connection (SSL). Click OK.
Configuring Apple Mail 2 to Connect Mailbox via IMAP
1.Open Apple Mail 2.
2.Click Mail, and select Preferences.
3.Click the plus sign (+) at the bottom to add a new account.
4.Set Account Type as IMAP and fill out the following fields:
•Enter Account Description.
•Enter your name in Full Name field.
•Enter email address to the Email Address field.
5.Click on Continue.
6.Fill out the following fields:
•Your Name: type in your name that will be shown to your e-mail recipients in the From: field. •Incoming mail server: imap.g4cloud.asia •User Name: email address •Password: type in your password.
7.Click on Continue twice.
8.Fill out the following fields:
•Outgoing mail server: auth.g4cloud.asia
•Check the Use Authentication checkbox.
•User Name: email address
•Password: type in your password.
9.Click on Continue twice.
10.Click on Done.
11.Click on Server Settings.
12.Check the Use Secure Sockets Layer (SSL) checkbox. Click on OK.
13.Select the Advanced subtab. Check the Use SSL checkbox.
14.Close the current window.
15.Click on Save.
Configuring Microsoft Office Outlook 2007 to Connect Mailbox via IMAP
1.Open Outlook
2.On the Tools menu, click Account Settings. The Account Settings window is displayed. The E-mail tab is opened by default showing all your set up e-mail accounts (if there any).
3.Click New. The Add New E-mail Account Wizard starts. You are prompted to Choose E-mail Service.
4.Select Microsoft Exchange, POP3, IMAP, or HTTP and click Next. The Auto Account Setup Wizard screen is displayed.
5.Select the Manually configure server settings or additional server types checkbox at the bottom of the Wizard screen, and then click Next. You are prompted to Choose E-mail Service.
6.Select Internet E-mail, and then click Next. The Internet E-mail Settings window is displayed. Provide the following information in the available fields:
•Your Name: type in your name that will be shown to your e-mail recipients in the From: field.
•E-mail Address: email address
•Account Type: select IMAP.
•Incoming mail server: imap.g4cloud.asia
•Outgoing mail server (SMTP): auth.g4cloud.asia
•User Name: email address
•Password: type in your password.
7.Click More Settings. The multi-tabbed window is displayed.
8.Move to the Outgoing Server tab, and then select the My outgoing server (SMTP) requires authentication checkbox. Then click Use same settings as my incoming mail server.
9.Move to the Advanced tab. Advanced properties of your e-mail account are displayed. Configure them as follows:
•In the drop-down menu located below the Incoming server (IMAP) field, select SSL Port 993 (pop3 995).
•In the drop-down menu located below the Outgoing server (SMTP) field, select TLS, Port 587.
10.Click OK to save your changes.
11.Click Test Account Settings to check that your account is working. If there is missing or incorrect information, such as your password, you are prompted to supply it or correct it.
12.After receiving Congratulations! All tests completed successfully, click Close
13.Click Next, and then click Finish.
Configuring Microsoft Office Outlook 2010 to Connect Mailbox via IMAP
1.Open Outlook
2.On the File tab, click Account Settings. The Account Settings window is displayed. The E-mail tab is opened by default showing all your set up e-mail accounts (if there any).
3.Click New. The Add New E-mail Account Wizard starts. You are prompted to Choose E-mail Account.
4.Select the Manually configure server settings or additional server types checkbox at the bottom of the Wizard screen, and then click Next.
5.Select Internet E-mail, and then click Next. The Internet E-mail Settings window is displayed. Provide the following information in the available fields:
•Your Name: type in your name that will be shown to your e-mail recipients in the From: field.
•E-mail Address: email address
•Account Type: select IMAP.
•Incoming mail server: imap.g4cloud.asia
•Outgoing mail server (SMTP): auth.g4cloud.asia
•User Name: email address
•Password: type in your password.
6.Click More Settings. The multi-tabbed window is displayed.
7.Move to the Outgoing Server tab, and then select the My outgoing server (SMTP) requires authentication checkbox. Then click Use same settings as my incoming mail server.
8.Move to the Advanced tab. Advanced properties of your e-mail account are displayed. Configure them as follows:
•In the drop-down menu located below the Incoming server (IMAP) field, select SSL.
•In the drop-down menu located below the Outgoing server (SMTP) field, select TLS.
9.Click OK to save your changes.
10.Click Test Account Settings to check that your account is working. If there is missing or incorrect information, such as your password, you are prompted to supply it or correct it.
11.After receiving Congratulations! All tests completed successfully, click Close
12.Click Next, and then click Finish.
Configuring Entourage 2004 to Connect Mailbox via IMAP
1.Open Entourage 2004.
2.Click Entourage, and select Account Settings.
3.Click on New.
4.Enter email address to the E-mail address field. Click on right arrow (>) twice.
5.Fill out the following fields:
•Enter your name in Your Name field.
•Enter email address to the Account ID field.
•Enter your Mailbox Password to the Password field.
•Check the Save password in Mac OS X Keychain checkbox.
•Enter imap.g4cloud.asia to the Incoming mail server field.
•Set Incoming mail server type as IMAP.
•Enter auth.g4cloud.asia to the Outgoing mail server field.
6.Click on right arrow (>) twice.
7.Click on Skip.
8.Enter name of account to the Account name field. Click on Finish.
9.Click on just created IMAP Account in Accounts window.
10.Press Click here for advanced receiving options.
11.Check the This IMAP service requires a secure connection (SSL) checkbox. Close the pop-up window.
12.Press Click here for advanced receiving options.
13.Click on Server Settings.
14.Check the SMTP service requires secure connection (SSL) checkbox. Select Use same settings as receiving mail server option. Close the pop-up window.
15.Click on OK.
16.Close Accounts window.
Configuring Entourage 2008 to Connect Mailbox via IMAP
1.Open Entourage 2008.
2.Click Entourage, and select Account Settings.
3.Click on New.
4.Set Account type as IMAP. Click on OK.
5.Fill out the following fields:
•Enter email address to the Account Name and Email Address field.
•Enter your name in Name field.
•Enter email address to the Account ID field.
•Enter your Mailbox Password to the Password field.
•Check the Save password in Mac OS X Keychain checkbox.
•Enter imap.g4cloud.asia to the Incoming mail server field.
•Enter auth.g4cloud.asia to the Outgoing mail server field.
6.Press Click here for advanced receiving options.
7.Check the SMTP service requires secure connection (SSL) checkbox. Close the pop-up window.
8.Press Click here for advanced receiving options.
9.Check the SMTP service requires secure connection (SSL) checkbox. Select Use same settings as receiving mail server option. Close the pop-up window.
10.Click on OK
11.Close Accounts window.
Configuring Outlook 2011 for Mac to Connect Mailbox via IMAP
1.Open Outlook 2011 for Mac
2.Open Tools > Accounts...
3.On the displayed page click on the + sign in the bottom left corner and then click E-mail...
4.Fill out the following fields:
•Enter email address in the E-mail address field.
•Enter your password to the Password field.
•Enter email address in the Username field.
•In the Type drop-down select IMAP.
•Enter imap.g4cloud.asia in the Incoming server field.
•Check the Use SSL to connect (recommended) checkbox under the Incoming server field.
•Enter auth.g4cloud.asia in the Outgoing server field.
•Check the Use SSL to connect (recommended) checkbox under the Outgoing server field.
5.Click Add Account.
6.Enter your name in the Account description field.
7.Click More Options...
8.In the Authentication drop-down select Use Incoming Server Info.
9.Click OK.
This category currently contains no pages or media.
